The Ultimate Guide to Masking in DaVinci Resolve
- London Video Editing Studio
- Sep 12, 2025
- 3 min read
Updated: Dec 24, 2025

Masking is one of the most powerful tools in DaVinci Resolve, allowing you to isolate parts of your footage for colour grading, compositing, or creative effects. Whether you’re cutting out a subject, creating a vignette, or colour-correcting only a specific area of the frame, masks give you precision control.
At Video Editor London we use masking techniques daily in professional projects, from branded content to cinematic storytelling. In this guide, you’ll learn step by step how to create a mask in DaVinci Resolve, including setting up nodes, using the alpha output, and refining your selection.
Why Use Masking in DaVinci Resolve?
Masking lets you:
Isolate your subject from the background.
Apply colour correction or grading to a specific part of the image.
Blur or sharpen only targeted areas.
Replace or composite backgrounds.
Create cinematic effects that draw the viewer’s eye.
Learning how to use masks efficiently will significantly expand what you can achieve in Resolve.
Step 1: Duplicate Your Clip
Start by duplicating your clip on the timeline. This creates two layers:
Bottom layer – your original clip.
Top layer – the layer you’ll use for masking.
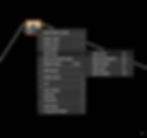
Step 2: Add a Serial Node
Select your top layer in the Color workspace.
Add a new Serial Node by pressing Alt+S (Windows) or Option+S (Mac).
This node will be where you apply your mask.
Step 3: Connect the Alpha Output
To make your mask visible, you’ll need to add an Alpha Output:
Right-click in the Node Editor space and select Add Alpha Output.
You’ll see a small blue dot appear.
Drag the blue dot from your new serial node and connect it to the Alpha Output.
This step tells Resolve where the mask should be cut out from.


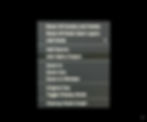
Step 4: Select the Masking Tool
Now it’s time to start creating your mask:
Click the Masking icon (the pen-shaped tool).
Ensure your playhead is at the beginning of your clip before starting.
Use the + Eyedropper tool to select the area you want to isolate.
Keep clicking on different points until you see a red mask overlay appear.
💡 Make sure the Mask Overlay toggle is turned on — this allows you to see the red masked area while working.

Step 5: Refine and Track the Mask
Once you’ve defined your mask area:
Press Play on the mask timeline so Resolve can process each frame.
The mask will track through your clip, adjusting frame by frame.
This ensures your masked area stays consistent even if your subject or camera moves.

Step 6: Hide the Overlay and Finish
When you’re happy with your selection:
Turn off the Mask Overlay toggle to hide the red highlight.
Your mask is now active, and you can apply grading, effects, or compositing just to that area.
That’s it — masking complete in DaVinci Resolve!
Common Masking Tips
Feather the edges for a smoother, more natural look.
Combine masks with Power Windows for added control.
If your subject moves a lot, use the tracking panel to improve accuracy.
Remember, you can stack multiple masks for complex effects.
Final Thoughts
Masking is one of the most powerful tools in DaVinci Resolve, allowing you to isolate parts of your footage for colour grading, compositing, or creative effects. Whether you’re cutting out a subject, creating a vignette, or colour-correcting only a specific area of the frame, masks give you precision control.
At Video Editor London we use masking techniques daily in professional projects, from branded content to cinematic storytelling. In this guide, you’ll learn step by step how to create a mask in DaVinci Resolve, including setting up nodes, using the alpha output, and refining your selection.
If you found this guide helpful, you may also want to check out our tutorials on: